Monday, March 20, 2017

DIY Frame in a shadow-box!


For a birthday coming up I decided to create a photo-frame for the birthday girl. But I wanted to do something more original than a simple frame. At the shop I saw a shadow box frame with a B&W picture in it that looked nice but unpersonalizable. So here's a DIY on how to make a personalized shadowbox-frame!

Here's what you'll need:

- a photo of your choosing
- a shadow box of the size of your picture 
- gold paint or a gold pen
- a printer 
- your text
- paper, pen, cissors, tape, ruler, brush

Step 1: 
Get your picture or print it 
Step 2 : 
Choose your text. For my case, i wrote it on the computer so i can choose what I exactly wanted but you could also use some existing quote online etc. If you're using photoshop or anything similar, flip your image then print it. If not, print it on thin paper and use transparency to reproduce. Here's what it should look like.


Step 3:
Stick with tape your reversed text on the front of your glass. Then copy your text with a gold pen or paint. Mine was not the best so I would not recommend it and will look for something else. Text needs to be well covered in gold. 


If you make mistakes, let it dry, then you can use a metal object to slowly and carefully scratch it. In my case I used an old tweezer and a brush to clean the gold dust.


Step 4: 
Once your done, it should look like that (up) . Then clean your glass with window cleaner, both sides but be careful to avoid the text, put all the frame back together, et voila! 


Need help? Or a frame? I can do custom orders too :) let me know in messages

Wednesday, March 8, 2017

Halloween costume 2017

A post long overdue!

I wanted to post here some pictures of my last Halloween couple costume with just-married hubby!

This year we were Corpse Bride Emily and Victor.
The Emily costume was the hard part. I wanted to do as much as I could from scratch to keep the feeling of the the 'hand-made puppet" into the costume.

So here are some of the 'tricks' I used:

For the skirts, I bought fabrics of different weights, cut them to look like tears and paint them with arabesques. Then finally saw them together.


The bustier is actually a cheap lingerie bustier that I covered  with lace with the sewing machine. I added some pearls and then paint with acrylic paint to obtain variations of blues and blacks.
The rib cage detais is actually polymer clay I sculpted, baked and glue to the bustier.
I rework the painting around this area to look hole, like a cratch in the dress.
I also bought cheap polyester gloves and painted them blue with bony fingers on them, (and imitate the teared effect on the gloves)


- The crown is made of plastic flowers painted and attached together with a metal wire 'crown'. The veil is handsaw with arabesque of blue string


- all the face is covered with body paint from Menhron, very nice to use and dry instantly
< here's some test paint I did on myself!
I bought a blue wig, lenses and a sock that I put on my arm  to imitate a skeleton arm!


- the Victor costume was simpler.  All I did was to transform a Elvis wig (yes!) to the shape I needed using a lot of glue and hair spray. Did some face make up as well and bought a tie and vest, pants. But the stripes on the pants are also handdrawn to again keep with puppet - hand-made effect as much as I could!
If you have any questions about these costumes please email me! ;)


Oh, and yes! I re used my real wedding bouquet as a prop! I just covered it with black tulle to give it a more 'moody effect" !

my Wedding DIY Final post!

My last DIY wedding post! the cake topper!
We wanted a personalized cake topper for our 'croquenbouche' cake so I decided to make one using polymer clay. For this I used :
- Sculpey original clay (the white one)
- sculpting tools, mostly a scalpel
- some paints, for the faces

The sculpey will need to be baked. It may leave some baking marks. Fro this reason I will advise to bake standing or on a surface that will not be visible. Baking time are indicated on the package of the clay, don't loose it! Scupey is great vbecause it never dry if not baked. So you can continue to work on it as long as you want
I will post here some of the later steps. If you need some more information email me!


And the final result!

My wedding DIY part 6 - the invitations

We decided to do all our watercolor invitations by hand.
For that, I used
- a heavy watercolor paper found at Michaels (100 lb+) Mine was a 24" sheet
- Acrylic paint from Basics
- Brushes for acrylic paints of various sizes
- scissors and scalpel
-painter's tape
-a surface to attached the painter's tape
-stamps (that I will talk about later) and stamp inks, a stamping block
-ruler, eraser, transparent paper

Starting from there I divided the sheet in 8 x 12 inches and taped each square to a wood support. This will help for the paper to not bend and stay flat.
Design will be your choice, but you will certainly use a pre made pattern you like on transparent paper and reproduce your drawing on each square before starting the painting
Here are some of the pictures of the different steps :


It is a lot of work and painting, but it has a "zen" effect as well

All the text is stamped on the card> For this I used an etsy shop that let you create  your own stamps, with whatever you need, here its link:  https://www.etsy.com/shop/BlueDiamondStamps
For Ink pads, I used Color Box. They were really good and easy to use for this project

< Here you can see a stamp I used on our envelopes
To finish, after they all dry, I erased all the lines and  I cut them to the shape I wanted (using a pattern that I created for it as well in cardboard)  with just scissors >
Repeat, 50+ times and
 the final result:


Wednesday, January 11, 2017

My Wedding DIY part 5 - the Arch


We created an arch for the ceremony with the help of my mom!
She bought a basic plant structure like this one but a green one as we had decided to cover it with wild ivy in the end

I created a wall of with flowers using the same idea as for the bouquets and the boutonieres: paper flowers. I used printer basic paper, as I felt it was a good way to recycle missed-prints sheets


But this one is very basic and simple. I used this model at first but you can easily cut an approximate clover shape  and have the same effect.
 They don't need a perfect shape as you're going to fold them in 4 to make them look like lily of the valley or orchid kind of flower.
For that just fold them in 4 at the center of the flower and roll up the end of each petal


Once you have made all the flowers, string them together on any kind of string you'd like to use (beading string is usually good ) using a large needle.
I felt 5-7 inch between each flower was a good distance.
If you want to make sure your flowers don't move - like in my case where I was traveling with it- you can add a touch of glue gun under each flower. It's a hassle, but it will make the garland way more solid

You will need 14 flowers per stings (a total of 22 strings in my case) .. And it should look something like this

If you're not attaching them right away to your arch, you should try to pack them separately as they will entangled. If the place where you use it is windy,  I'll advise to add an horizontal transparent string at the bottom of the garland on the arch to stabilize them

My mom use burlap and branches to give some shape to the structure. Then at the last minute added some wild ivy branches to give it a green-fresh look  (pictures above are her tests)


Wednesday, December 14, 2016

My DIY Wedding part 4 - the Guest book


I wanted to have a guest book which will also be a photo book and a memorabilia book, so I bought this craft book and start my cover!

This cover is make of original soft Sculpey, (the one you bake), and painted with oil paints. Why oils? because it stays liquid for long and is greasy enough to be "sponged or brushed" and enter in all creases for the cover


For this you would need :
- a book like the one in the pic under (amazon, michaels, joann etc) - with a spiral binbing you can open
- sculpey like this
- oil paints for adding volume and details
-  brushes, sponges, towels..
- sculpting tools (or knife, scalpel, needle etc)
- aluminum paper and your oven
- paper, crayon
- glue gun

First, you need to find your design. you should draw it once on a paper or on your book cover to see how it fits. Then, take your book and open the spiral binding (to do so, return your book and look for the opening of the spiral, they sell machines to open these (cinch tool)  but in the case of a large stiff spiral as this one, you should be able to slightly open them by hand and slide that cover page out )


Then start to kneed some of the dough. Then grab an aluminum sheet or parchment paper big enough to cover the front page. On it, lay a thin layer on sculpey, like a very fine pizza crust. Cut the excess around to match the shape of your cover. That will be the base you cover.

From there, start to add your design to that thin layer.
Tip: add the most important and large figures first, work on the details after.
You can use any tools you like. This sculpey is very solf and easy to shape 


It took me hours to achieve the look that I wanted - but when I decided I was done, I finished by adding the holes for the spirals.
For that, slide your Sculpey cover onto your detached cardboard book cover. With your finger and a pen aim for the holes and pierce through the aluminum to recreate the holes. This is also the time to check if the shape of your sculpey cover still match you cardboard cover. If not, you can cut the excess or reshape what you want better .

Turned the oven on to 275degres and delicately slide the aluminum sheet onto a baking plate and put it in the oven for 12-15min depending on the thickness- 
 & Let it cool down.


After that you can start the oil painting application. In my case I didn't want to much colors but I wanted to add volume to the shapes so I added a layer of brown (burnt sienna) all over the cover, insisting on the creases. When it's entirely covered take a towel, fabric scraps (q-tips!) and start to remove all the paint you just applied. Doing this will let the paint dry only in the creases/depth and get your white color on the parts the more in volume. Let dry at least overnight the brown paint. To add more contrast I did the same thing but reversed with white. With a sponge and a brush I added some light where I feel the light should be hitting.

If you want you could also add hint of other colors like I did for the hair, leaves etc. with that sponge or brush to the areas you'd like using the same technique. (again, wait at least a day between each colors)

To finish glue the cover to the cardbord cover using a glue gun (or any strong glue). The sculpey may have bend a bit at baking time but you should be able to bend it to the page using some weight overnight.
After that you could varnish it if you want, but it is not necessary.
Attach the full cover back into its spiral, add a bow and voila!
If you have questions please let me know!

Tuesday, November 29, 2016

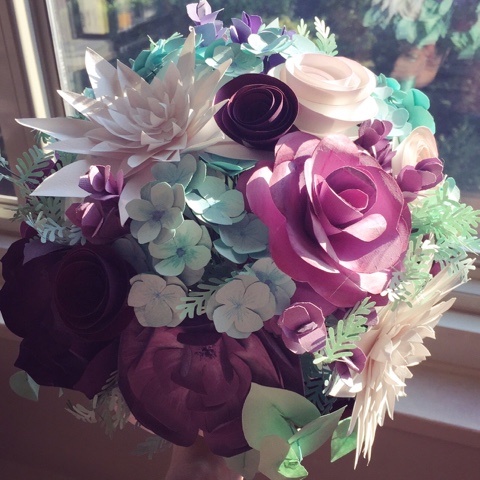
My DIY Wedding - part 3 - bride's bouquet


Inspired by the bridesmaids bouquets I also made my bouquet! I used the same "rolled flowers" technique but also a few other folding paper techniques to get different types of flowers -
Differently to the girls's bouquet, mine was not based on a styroball but had actual wire "stems"  - so one of the difficult part was to arrange the flowers in a proper bouquet shape at the end

What you need:
-card stock paper (in various colors)
-glue gun
-florist wire like this  (around gauge 22) - for tsmall flowers
- floral stem wire like this   - for larger flowers
- florist tape like this
- Ribbon
- cissors
- Paints or crayons id you want to add designs on your flowers


There's a lot of paper roses designs online and I'd like to thanks every DIY-ers for theirs ideas!

For these flowers I used this pattern : roses
It's basically a rose out of 6 flat flower, you cut flolowing the line and use each one of your cuts. You will then roll them and glue them together, for the xterior petal to the heart of the flowers. A rigid paper will work better for these.


For the "rolled rose, you can have a look to my bridesmaid bouquet's post
 https://cafe-croquis.blogspot.com/2016/11/my-diy-wedding-part-1-bridemaids.html

The only difference here is that I glued each flower on a florist green wire stem  (using a glue gun and some patience for the glue to dry! )


For the lily-alike  flowers, you can use as well a 5-petals pattern like this one  or just draw it by hand yourself using a circle as your base. (or use a cricut if you have one)
You will need 4 sizes of that same design, from the bigger petal size you want (4.5 in diameter in my case) to the smallest (1 inch in my case). Each flower will have 6 flower "layers" : 1 large petal - 2 mid-large petals, 2 mid-smal petals - 1 small petal.


Once you cut your flower layers,you want to slightly fold them up with your fingers to give them some volume (picture on the right), like they're blooming from the center. Once it's done, glue the centers of each layer on top of each other, in staggered positions, from the bigger layer to the smaller one (Try to not flatten the flower, glue only the center to let the petal bloom.)
Glue securely a wire stem under the flower with the glue gun.


I used the same idea for the tiny blue flowers but only with 2 flower layers, and a bit of blue crayon to mark the center.
I glued them on thinner wire to look like some kind of blue lilac.
Same for the heart-leaves.
And as I said in another post, fern were punch cut with this
then glue to thin green wire. This takes a lot of time and patience as you can't put a lot of glue . Just a touch, and let it dry!


To Attach the flower together and form the bouquet first place the big flowers the way you would like them in your hand, then add the medium ones and the small ones. Each time you add enough flower, solidify the bouquet by taping the stem together using the florist tape.
 At the end add the leaves. You want the bouquet to be very tight so you don't see the wire under. Them cover the stems with a glued on ribbon. Tulle will hide the seam.

Final result: